
If you’re interested in using the External Secrets Operator with Argo CD and GitOps, check out the next article.
Introduction
GitOps is great! What is GitOps?
GitOps is a way to do Kubernetes cluster management and application delivery. GitOps works by using Git as a single source of truth for declarative infrastructure and applications.1
Put more simply GitOps allows you to setup and manage your infrastructure and applications as code via Git.
But what about passwords, api tokens, database credentials and other secrets? Can these be stored in Git too? NO!!! Storing secrets in Git is a very bad idea2. This leads us to a common question, “How do you handle secrets with GitOps?”.
There are many options. A common method is to use a secret management tool (such as HashiCorp Vault) for the secrets themselves and another tool (or tools) that pulls those secrets from the management tools and ‘injects’ them into the Kubernetes cluster.
This tutorial covers the specific scenario of managing secrets using the Argo CD Vault Plugin. The Argo CD Vault Plugin (as the name suggests) is an Argo CD configuration management plugin compatible with many secret management tools (HashiCorp Vault, IBM Cloud Secrets Manager, AWS Secrets Manager, etc.). This tutorial covers its integration with HashiCorp’s Vault.
Prerequisites
For this guide you’ll need the following:
- A HashiCorp Vault installation
- Beginner to intermediate knowledge of Terraform, Kubernetes, Git/GitHub and Traefik
- Terraform ≥ v0.15
How the Argo CD Vault Plugin Works
The Argo CD Vault Plugin allows for a placeholder to be stored in git instead of an actual Kubernetes secret.
So a typical yaml/manifest secret e.g.
apiVersion: v1
kind: Secret
metadata:
  name: mysecret
type: Opaque
data:
  TOKEN: bXlfZmlyc3Rfc2VjcmV0
Would be stored in git with the value of TOKEN substituted for a placeholder e.g. <myToken>:
...
  TOKEN: <myToken>
The image below illustrates the steps in the process when Argo CD Vault Plugin injects secrets into a Kubernetes cluster:
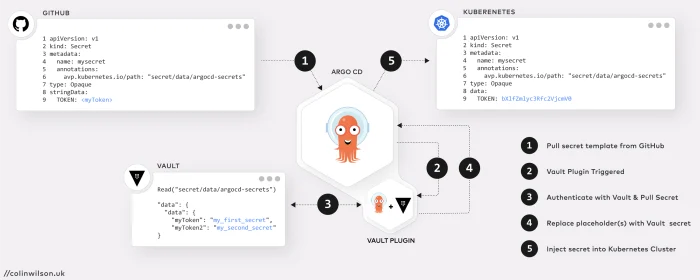
- Argo CD pulls the secret manifest template from GitHub
- The Vault Plugin is triggered by the presence of a placeholder in the template
- The plugin authenticates with Vault and pulls the secret (located according to the path set by the
avp.kubernetes.io/pathannotation) - The retrieved secret(s) are injected into the template replacing the placeholder(s)
- Argo CD then applies the updated manifest to Kubernetes
N.B. The Argo CD Vault Plugin is not exclusively for use with secrets. It can also be used for deployments, configMaps or any other Kubernetes resource.
Setup Argo CD with the Vault Plugin using Terraform
For this tutorial I authored a couple of Terraform modules3 to automate the installation and configuration of Argo CD; one to setup and install Argo CD along with the Argo CD Vault Plugin and another to install Traefik as a proxy to expose the Argo CD API/CLI Server.
Both modules utilise the Terraform helm provider to install and configure Argo CD and Traefik on a Kubernetes cluster. The Vault Plugin is installed by referencing a custom file (argocd+vault-plugin_values.yaml) within the Argo CD module.
There are a few ways to install the Vault Plugin in Argo CD. The Argo CD Terraform module in this tutorial uses the init container method
1. Clone the Terraform Example Repository
Clone the Argo CD Terraform module example repository
git clone -b terraform-kubernetes-argocd https://github.com/colinwilson/example-terraform-modulesand navigate to the vault_plugin directory.
example-terraform-modules/
|-- default/
`-- vault_plugin/
    |-- .gitignore
    |-- README.md
    |-- argocd+vault-plugin_values.yaml
    |-- main.tf
    |-- outputs.tf
    |-- terraform.tfvars
    `-- variables.tf
2. Update Argo CD Custom Values File
The cloned example includes a custom values file named argocd+vault-plugin_values.yaml. Before applying the Terraform module you’ll need to update this file with values relevant to your deployment:
Custom argocd+vault-plugin_values.yaml file - [click to expand]
- Line 9: This is Argo CD’s externally facing base URL (optional). Replace this with the external URL you plan on accessing your Argo CD server from e.g. via an ingress controller (e.g. Traefik, Nginx).
- Line 18: If you’ve renamed the Vault configuration secret created earlier to something other than
vault-configuration, replace this here.
# Custom values for ArgoCD
server:
  config:
    configManagementPlugins: |
      - name: argocd-vault-plugin
        generate:
          command: ["argocd-vault-plugin"]
          args: ["generate", "./"]
    url: https://argocd.colinwilson.uk  #<- replace this with your own custom url

repoServer:
  serviceAccount:
    create: true
    name: argocd-repo-server

  envFrom:
    - secretRef:
        name: vault-configuration

  initContainers:
    - name: download-tools
      image: alpine:3.8
      command: [ sh, -c ]
      args:
        - wget -O argocd-vault-plugin
          https://github.com/argoproj-labs/argocd-vault-plugin/releases/download/v1.11.0/argocd-vault-plugin_1.10.1_linux_amd64 &&
          chmod +x argocd-vault-plugin && mv argocd-vault-plugin /custom-tools
      volumeMounts:
        - mountPath: /custom-tools
          name: custom-tools

  # -- Additional volumeMounts to the repo server main container
  volumeMounts:
    - name: custom-tools
      mountPath: /usr/local/bin/argocd-vault-plugin
      subPath: argocd-vault-plugin

  # -- Additional volumes to the repo server pod
  volumes:
    - name: custom-tools
      emptyDir: {}
3. Create Vault Configuration Secret
The Vault plugin needs to authenticate with a Vault installation to access secrets. There are 3 different ways to pass this authorisation configuration to the Argo CD Vault plugin4. For this tutorial create a Kubernetes secret named vault-configuration in the argocd namespace with the required credentials. The ArgoCD plugin supports the AppRole and GitHub Auth Method for retrieving secrets from Vault5. The below example secret utilises the GitHub Auth Method (which also requires a GitHub Personal Access Token):
# Vault Configuration Secret
apiVersion: v1
kind: Secret
metadata:
  name: vault-configuration
  namespace: argocd
type: Opaque
data:
  VAULT_ADDR: aHR0cHM6Ly92YXVsdA==
  AVP_AUTH_TYPE: Z2l0aHVi
  AVP_GITHUB_TOKEN: Z2hwX0UyWjJES1pnNmFRTm1yRmVybXN2dWs4ZXRPejVqSzFVSURIVA==
  AVP_TYPE: dmF1bHQ=
4. Apply the Argo CD Module
Initialise the module (terraform init) and then run apply (terraform apply).
Once Terraform has completed provisioning the Argo CD resources, run the following command to confirm all the pods have been successfully deployed on the cluster:
kubectl -n argocd get pods
NAME                                                READY   STATUS    RESTARTS   AGE
argocd-redis-84fd976589-czmk9                       1/1     Running   0          4m
argocd-notifications-controller-789669b976-6hwpg    1/1     Running   0          4m
argocd-applicationset-controller-5b5ddd4f86-dsz8w   1/1     Running   0          4m
argocd-dex-server-879757589-9zd9b                   1/1     Running   0          4m
argocd-application-controller-0                     1/1     Running   0          4m
argocd-server-6f55c8464-z4kf5                       1/1     Running   0          4m
argocd-repo-server-6cb5f65dbf-fdjwf                 1/1     Running   0          4m
5. Deploy/Configure an Ingress Controller (Traefik)
Now that Argo CD is deployed you’ll most likely want to expose it via an ingress. There are several ways ingress can be configured6. As previously mentioned, Traefik (v2.x) is deployed via a Terraform Module. Once Traefik has been deployed, apply the IngressRoute CRD7 shown below to expose the Argo CD API & CLI:
apiVersion: traefik.containo.us/v1alpha1
kind: IngressRoute
metadata:
  name: argocd-server
  namespace: argocd
spec:
  entryPoints:
    - websecure
  routes:
    - kind: Rule
      match: Host(`argocd.colinwilson.uk`)
      priority: 10
      services:
        - name: argocd-server
          port: 80
    - kind: Rule
      match: Host(`argocd.colinwilson.uk`) && Headers(`Content-Type`, `application/grpc`)
      priority: 11
      services:
        - name: argocd-server
          port: 80
          scheme: h2c
  tls:
    secretName: argocd-colinwilson-uk-live
line 23-24 configures the IngressRoute with a TLS certificate secret named
argocd-colinwilson-uk-live. If no certificate is configured, Traefik will use its automatically generated self-signed certificate.
Once the ingress controller has been successfully configured open a browser and navigate to the custom url defined earlier to access the Argo CD UI. Login with username admin and password admin.

Deploy an Argo CD App with the Vault Plugin
Now that Argo CD is deployed with the Vault plugin installed it’s time to create an application that makes use of the plugin.
1. Create a Secret in Vault
Create an example secret in Vault using the following command:
vault kv put secret/argocd-secrets myToken=my_first_secret myToken2=my_second_secretKey Value
--- -----
created_time 2022-04-27T03:59:23.187486924Z
custom_metadata <nil>
deletion_time n/a
destroyed false
version 1
2. Create a Secret Manifest in Git/GitHub
Before creating an Argo CD app that uses the Vault plugin, create a new GitHub repo containing a templated secret manifest, mysecret.yaml or fork the example repo.
argocd-micro-example-apps/
`-- secrets/
    `-- mysecret.yaml
The Vault plugin will substitute the placeholder in this template, <myToken> (line 9), with the value of the like-named key in Vault:
apiVersion: v1
kind: Secret
metadata:
  name: mysecret
  annotations:
    avp.kubernetes.io/path: "secret/data/argocd-secrets"
type: Opaque
stringData:
  TOKEN: <myToken>
So the Vault plugin knows where to locate the secret value in Vault, the annotation (line 6) in the above manifest must correspond to the path where the secret was created (secret/data/argocd-secrets).
Vault version 2 kv store uses a prefixed API, which is different from the version 1 API. Writing and reading versions are prefixed with the
data/path8. So a secret created by thevault kv putcommand with path
secret/argocd-secretsWould be read by including the
/data/prefix
secret/data/argocd-secrets
3. Deploy an Application using the Argo CD CLI
Download and install the Argo CD CLI9 from the project release page on GitHub, https://github.com/argoproj/argo-cd/releases/latest. Then login to the Argo CD server using the argocd command:
argocd login argocd.colinwilson.uk
Username: admin
Password:
'admin:login' logged in successfully
Context 'argocd.colinwilson.uk' updated
Deploy a new Argo CD App using the following argocd command:
argocd app create secrets --repo https://github.com/colinwilson/argocd-micro-example-apps.git --path secrets --dest-server https://kubernetes.default.svc --dest-namespace default --config-management-plugin argocd-vault-plugin --sync-policy automated --self-healLet’s breakdown the flags specified in the above command:
argocd app create secretscreates an Argo CD application named ‘secrets’--repo https://github.com/colinwilson/argocd-micro-example-apps.gitspecifies the URL of git repository the app should use--path secretsspecifies the path within the git repo to use as the app directory--dest-server https://kubernetes.default.svcdeploy the app internally i.e. the same Kubernetes cluster Argo CD is installed on--dest-namespace defaultthe namespace to deploy the app to (argocd)--config-management-plugin argocd-vault-plugininstructs the created app to use the Argo CD Vault Plugin--sync-policy automatedset the sync policy toautomated(optional)--self-healenable self healing when--sync-policyis set toautomated(optional)
The application should now be visible in the Argo CD UI!

Clicking on the app will display additional details about it

4. Confirm the Vault Plugin has done its job!
Now that the app has been successfully deployed it’s time to confirm that the Kubernetes secret generated via the GitHub template does in fact contain the value of myToken retrieved from Vault.
The following kubectl command retrieves the value of the TOKEN key for the secret (mysecret) in the cluster:
kubectl -n default get secret mysecret -o jsonpath="{.data.TOKEN}" | base64 -d; echomy_first_secret
Re-reading the secret from Vault gives the same result, thus (again) confirming the Vault Plugin worked!
vault kv get -field=myToken secret/argocd-secretsmy_first_secret
Updating the Vault Secret
So what happens if we update the the value of the myToken key in Vault? Say to my_alternate_secret?
vault kv put secret/argocd-secrets myToken=my_alternate_secret myToken2=my_second_secretKey Value
--- -----
created_time 2022-04-27T04:27:03.187486924Z
custom_metadata <nil>
deletion_time n/a
destroyed false
version 2
All that’s necessary is to perform a Hard Refresh via the Argo CD UI:
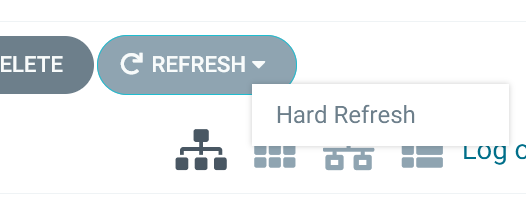
And the Vault Plugin will re-pull the secret from Vault. Argo CD will then sync the ‘secrets’ app to update the Kubernetes secret with this new value. Run the kubectl command below to confirm the new value has been injected into the cluster:
kubectl -n default get secret mysecret -o jsonpath="{.data.TOKEN}" | base64 -d; echomy_alternate_secret
Summary
So using the Argo CD Vault Plugin allows secrets to be securely stored and managed within a GitOps workflow. Keep in mind, that this tutorial covers only one of several possible configuration and deployment scenarios. The plugin works with secret management tools other than HashiCorp Vault and as previously mentioned, can be used for Kubernetes deployments, configMaps and any other K8s resource. Be sure to check out the documentation of both the plugin and Argo CD for details on alternative configuration options.
References
- Argo CD Documentation
- Argo CD Vault Plugin Documentation
- https://github.com/colinwilson/example-terraform-modules/tree/terraform-kubernetes-argocd
- https://github.com/aigisuk/terraform-kubernetes-argocd
- https://github.com/aigisuk/terraform-kubernetes-traefik
- https://github.com/colinwilson/argocd-micro-example-apps